HiChord // Manual
HiChord is a chord synthesizer with 7 Chord Buttons that play the chords naturally occurring in any musical key. Press any chord button and the chords always work together — no music theory required. Hold a chord button and move the joystick to modify the chord (major to minor, sus4, 7ths, extended chords, etc). Change keys instantly with F1 + LEFT/RIGHT.
The sound engine combines digital oscillators, FM synthesis, and sample playback across 12 voices. Onboard effects include reverb, delay, chorus, and flanger. The 2-track looper captures your progressions for live layering.
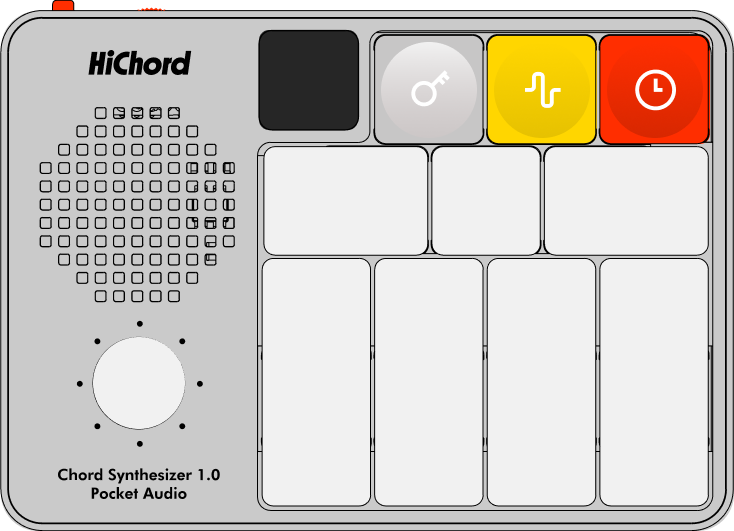
HiChord Hardware Layout: OLED display (left), 8-direction joystick, 3 function buttons (F1 gray, F2 yellow, F3 red), and 7 Chord Buttons (1-7)
TABLE OF CONTENTS
00 // QUICK START
First Time Using HiChord?
- Power on: Slide the red power button on top.
- Adjust volume: Use the volume slider on top. For best sound quality, use headphones connected to the headphone jack.
- Play a chord: Press any Chord Button 1-7. These represent scale degrees (I, ii, iii, IV, V, vi, vii°).
- Try different sounds: Press F2 to enter Sounds menu, then LEFT/RIGHT to browse Sounds.
- Add effects: Press F2, Joystick UP to enter Effects, use LEFT/RIGHT to find REVERB or DELAY, then UP to toggle ON/OFF.
- Change key: Press F1, then Joystick LEFT/RIGHT to transpose.
- Try modes: Hold F3, then press Chord Buttons 1-7 for quick mode select (ONESHOT, STRUM, LEAD, DRONE, ARPEGGIO, REPEAT, DRUMMODE).
Three Function Buttons
- F1 — Settings Menu (key, octave).
- F2 — Effects & Sounds Menu (effects, waveforms).
- F3 — Mode Selection & BPM (tempo, modes).
Having trouble or have questions? Contact our support team at support@hichord.shop
01 // BASIC OPERATION
Playing Chords
The 7 Chord Buttons trigger chords using the Diatonic Chord System. Each chord button represents a scale degree in the current key. In major mode:
| CHORD BUTTON | DEGREE | DEFAULT CHORD TYPE | EXAMPLE (KEY OF C) |
|---|---|---|---|
| 1 | I | Major | C Major |
| 2 | ii | minor | D minor |
| 3 | iii | minor | E minor |
| 4 | IV | Major | F Major |
| 5 | V | Major | G Major |
| 6 | vi | minor | A minor |
| 7 | vii° | dim | B diminished |
Modifying Chords with Joystick
How it works: Hold any Chord Button, then move the joystick in any direction to modify the chord quality in real-time. Release the joystick to return to the default chord.
Example: Hold Chord Button 1 (I chord, C Major), push joystick UP to toggle to C minor, or push RIGHT for C Maj7, or push DOWN for C sus4.
| ↖ aug |
↑ Maj/min |
↗ dom7 |
| ← dim |
● (base) |
→ Maj7/m7 |
| ↙ 6/sus2 |
↓ sus4 |
↘ 9 |
Note: Some modifications depend on base chord quality (major/minor)
DEFAULT MODE (Basic Chord Modifications)
In DEFAULT mode, some modifications depend on the base chord type (major/minor/diminished):
| JOYSTICK | RESULT CHORD |
|---|---|
| UP | Major ↔ Minor |
| DOWN | → sus4 |
| LEFT | → dim / Minor |
| RIGHT | → Maj7 / min7 |
| UP+LEFT | → aug |
| UP+RIGHT | → dom7 |
| DOWN+LEFT | → Maj6 / sus2 |
| DOWN+RIGHT | → Maj9 / min9 |
EXTENDED MODE (Advanced Extensions)
In EXTENDED mode, most directions produce fixed chord types regardless of base chord:
| JOYSTICK | RESULT CHORD |
|---|---|
| UP | Major ↔ Minor |
| DOWN | dom7♯9 |
| LEFT | sus4+7 |
| RIGHT | add11 |
| UP+LEFT | half-dim7 |
| UP+RIGHT | dom9 |
| DOWN+LEFT | add9 |
| DOWN+RIGHT | min11 |
CHROMATIC MODE (Jazz Voicings)
CHROMATIC mode provides sophisticated jazz chords and chromatic pitch shifting:
| JOYSTICK | RESULT CHORD |
|---|---|
| UP | min(maj7) |
| DOWN | Maj13 |
| LEFT | half-dim7 |
| RIGHT | 6/9 |
| UP+LEFT | Maj7♯11 |
| UP+RIGHT | dom13 |
| DOWN+LEFT | dom7♭9 |
| DOWN+RIGHT | dom7alt |
Switching Between Modes
To change joystick mode:
- Press F2 to open Effects menu.
- Navigate to JOYSTICK option (use Joystick LEFT/RIGHT).
- Press Joystick DOWN to cycle: DEFAULT → EXTENDED → CHROMATIC → (back to DEFAULT).
- Display shows current mode: "JOYSTICK DEFAULT", "JOYSTICK EXTEND", or "JOYSTICK CHROMATIC".
Inversions
What are inversions? Inversions change which note is lowest in the chord voicing, creating smoother bass movement between chords.
Manual control: While holding any Chord Button, press F2 to cycle through inversions:
- Root Position (default) → 1st Inversion → 2nd Inversion → (repeat).
Automatic voice leading: Enable VOICE LEAD in the F2 Effects menu to have HiChord automatically select inversions for smooth voice leading between chords. This creates professional-sounding progressions with minimal melodic motion.
Chord Lock (Make Modifications Permanent)
Purpose: Save a modified chord (like sus4 or Maj7) so the chord button always plays that variation.
To lock a chord:
- Hold Chord Button (e.g., Chord Button 4).
- Move joystick to desired modification (e.g., UP for sus4).
- While still holding both, press F2
- Display shows "LOCKED" — Chord Button 4 now always plays IV sus4.
To unlock: Repeat the same process (hold chord button + joystick direction + F2)
Cross-Key Chord Transfer:
Chord Lock saves the exact chord structure, allowing you to transfer a chord from one key to another:
- In your current key (e.g., C Major), build and lock a chord (e.g., Chord Button 4 with sus4 modification).
- Change to a different key (e.g., F Major) using the joystick + F1.
- The locked chord button (Button 4) now plays the same chord structure in the new key (F sus4 instead of C sus4).
- This allows you to create consistent chord voicings across multiple keys without reconfiguring each time.
Example Use Case: Lock a Maj7 chord on Button 1 in C Major, then switch to G Major — Button 1 automatically becomes G Maj7 with the same voicing.
Octave Shifting
Per-Button Octave
Purpose: Raise or lower the pitch range of individual Chord Buttons for more voicing flexibility.
- Octave DOWN: Hold Chord Button, then press F1
- Octave UP: Hold Chord Button, then press F3
- Range: -2 octaves → -1 octave → Normal → +1 octave.
- Each chord button remembers its octave setting independently.
Global Octave (All Chord Buttons)
Purpose: Shift the pitch range of all Chord Buttons simultaneously.
Operation:
- Press F1 to open KEY + OCTAVE menu.
- Use Joystick UP/DOWN to adjust global octave.
- Range: -1 octave → +0 (normal) → +1 octave → +2 octaves.
Also in F1 menu: Use Joystick LEFT/RIGHT to change key (transpose all chords)
The F1 menu closes automatically after 5 seconds of inactivity, or press F1 again to close immediately.
Global vs Per-Button: Global octave shifts apply to all chord buttons at once, while per-chord-button shifts allow you to create custom voicings where different Chord Buttons play in different octave ranges.
Changing Key
How to change key: Press F1 to open KEY + OCTAVE menu, then use Joystick LEFT/RIGHT to select a new key.
Available keys: C, C#, D, D#, E, F, F#, G, G#, A, A#, B (all 12 chromatic keys)
All Chord Buttons transpose to the new key, maintaining Diatonic Chord System relationships. The current key is always displayed on screen.
BPM (Tempo)
How to change BPM: Press F2 → navigate to BPM → Joystick UP/DOWN to adjust (60-190 BPM)
What it affects: All rhythm rates, delays, arpeggios, drum loops, sequencer, and metronome sync to the current BPM.
02 // SOUND SELECTION
HiChord offers multiple synthesis engines: analog waveforms, FM synthesis, sample playback, and hybrid presets. Choose sounds that fit your musical style.
Method 1: Quick Select (Fastest)
Hold F2 first, then press a Chord Button for instant sound selection:
| F2 + BUTTON | WAVEFORM | TYPE |
|---|---|---|
| 1 | SAW | Analog |
| 2 | SINE | Analog |
| 3 | FM_EPIANO | FM Synthesis |
| 4 | FM_HX7 | FM Synthesis |
| 5 | STRINGS | Sample |
| 6 | CLARINET | Sample |
| 7 | FM_BELL | FM Synthesis |
Method 2: Browse All Sounds
- Press F2 to enter Sounds menu.
- Use Joystick LEFT/RIGHT to browse all available Sounds.
- Display shows Sound name and animated waveform preview.
- Press Joystick DOWN to exit.
All Available Waveforms
Analog Waveforms
- SINE — Pure fundamental tone.
- SAW — Bright, harmonically rich.
- TRIANGLE — Soft, mellow.
- SQUARE — Hollow, 8-bit character.
FM Synthesis
- FM_EPIANO — Electric piano (Rhodes-style).
- FM_HX7 — DX7-style digital synthesis.
- FM_BELL — Bell tones.
- FM_ORGAN — Organ tones.
- FM_BRASS — Brass section.
Sample Playback
- SAMPLE_STRINGS — Orchestral strings.
- SAMPLE_CLARINET — Woodwind clarinet.
- SAMPLE_CELLOS — Cello section.
- SAMPLE_ACOUSTIC — Acoustic guitar.
- SAMPLE_BRASS — Brass ensemble.
- SAMPLE_PIANO_UPRIGHT — Upright piano.
- SAMPLE_VIBRAPHONE — Vibraphone/marimba.
- SAMPLE_VIOLINS — Violin section.
- SAMPLE_VOX_AHH — Vocal "ahh" sounds.
- SAMPLE_WURLI — Wurlitzer electric piano.
- SAMPLE_USER — Custom user sample (uploaded via Companion App).
Hybrid Presets
- SAWSQUARE — Layered saw + square waves.
- JUNO_POLY — Juno-106 style polysynth pad.
- OCEAN_PAD — Ambient soundscape (noise + FM).
- WOBBLE_BASS — LFO-modulated bass sound.
03 // EFFECTS MENU
Accessing Effects
- Press F2 to enter Sounds menu (base menu shows waveforms).
- Press Joystick UP to enter Effects submenu.
- Use Joystick LEFT/RIGHT to cycle through Effects.
- Display shows Effect name with animated icon and current status in the top bar.
- Use Joystick UP to adjust/toggle the selected Effect.
- Press Joystick DOWN to return to Sounds menu, then DOWN again to exit completely.
The F2 menu structure has been redesigned. Pressing F2 now opens the Sounds menu first (showing waveforms with animated icons), then Joystick UP takes you to the Effects submenu. This two-level design separates sound selection from effect adjustment, making navigation more intuitive. Effects are now toggled with Joystick UP (not DOWN), and the display shows animated icons with status indicators.
Effect Descriptions
REVERB
To use: Press F2 → Joystick UP → Navigate to REVERB → Joystick UP toggles ON/OFF.
Stereo reverb processor with 65-75% feedback for spacious ambience. Creates room/hall simulation with independent left/right processing.
GLIDE
To use: Press F2 → Joystick UP → Navigate to GLIDE → Joystick UP toggles ON/OFF.
Portamento effect — smooth pitch glide between notes. When enabled, oscillator frequencies slide from previous note to new note instead of jumping instantly.
DELAY
To use: Press F2 → Joystick UP → Navigate to DELAY → Joystick UP cycles through rates.
Stereo delay line (max ~1 second) with tempo synchronization. Automatically adjusts delay time to match BPM setting.
Available rates:
- OFF.
- 1/4 (quarter note).
- 1/8 (eighth note).
- 1/16 (sixteenth note).
- 1/16T (triplets).
- 1/32 (thirty-second note).
TREMOLO
To use: Press F2 → Joystick UP → Navigate to TREMOLO → Joystick UP cycles through rates.
Amplitude modulation. Depth is preset. Rates are the same divisions as DELAY (OFF, 1/4, 1/8, 1/16, 1/16T, 1/32).
STEREO
To use: Press F2 → Joystick UP → Navigate to STEREO → Joystick UP toggles ON (wide) / OFF (mono).
Stereo width control. When ON, oscillators are panned across stereo field with layered voices detuned and panned opposite for width. When OFF, all voices sum to mono center.
VOICE
To use: Press F2 → Joystick UP → Navigate to VOICE → Joystick UP cycles through voice counts.
Voice count/polyphony control.
Available options:
- VOICE1 (mono).
- VOICE2 (2 voices).
- VOICE4 (4 voices).
- VOICE8 (8 voices - full polyphony).
ADSR
To use: Press F2 → Joystick UP → Navigate to ADSR → Joystick UP cycles through presets.
Envelope shape presets.
Available presets:
- LONG — Slow attack/release.
- SHORT — Fast attack/release.
- SWELL — Slow attack, sustained.
- PLUCK — Percussive, short decay.
- TOUCH — Medium attack, expressive.
- SUSTAIN — Full sustain, long release.
BASS
To use: Press F2 → Joystick UP → Navigate to BASS → Joystick UP cycles through modes.
Sub-bass oscillator control.
Available modes:
- OFF — No bass.
- ROOT — Bass plays root note.
- SLASH — Custom bass note (slash chord).
FILTER
To use: Press F2 → Joystick UP → Navigate to FILTER → Joystick UP toggles ON/OFF.
To adjust cutoff: Hold F3 and move Volume Knob (filter mode engages automatically, then Joystick UP/DOWN also adjusts cutoff).
State variable lowpass filter with adjustable cutoff frequency (20Hz-20kHz). Smoothly attenuates frequencies above cutoff point.
FLANGER
To use: Press F2 → Joystick UP → Navigate to FLANGER → Joystick UP toggles ON/OFF.
LFO-modulated delay line creating classic jet-plane sweeping effect. Uses stereo processing with configurable feedback, depth, and modulation rate.
MIDI
To use: Press F2 → Joystick UP → Navigate to MIDI → Joystick UP toggles ON/OFF.
MIDI output toggle. Enables/disables MIDI note output via USB-C. See MIDI Over USB-C section for full technical details.
CHORUS
To use: Press F2 → Joystick UP → Navigate to CHORUS → Joystick UP toggles ON/OFF.
Stereo chorus with 0.5Hz LFO modulation, creating rich detuned doubling effect. Left/right channels use slightly different LFO frequencies (0.5Hz vs 0.52Hz) for natural stereo width. Famous Juno-style chorus sound.
SCALE
To use: Press F2 → Joystick UP → Navigate to SCALE → Joystick UP cycles through scales.
Scale selector. Each scale changes the chord qualities for all 7 chord buttons to match that scale's harmonic structure.
Available Scales:
- MAJOR — Standard major scale (I, ii, iii, IV, V, vi, vii°).
- NATURAL MINOR — Natural minor scale (i, ii°, III, iv, v, VI, VII).
- HARMONIC MINOR — Minor with raised 7th (i, ii°, III+, iv, V, VI, vii°).
- MELODIC MINOR — Ascending melodic minor (i, ii, III+, IV, V, vi°, vii°).
- MAJOR PENTATONIC — 5-note major scale with sus chords.
- MINOR PENTATONIC — 5-note minor scale with sus chords.
- BLUES — Blues scale with characteristic ♭3, ♭5, ♭7.
- DORIAN — Minor with major 6th (jazz/modal sound).
- MIXOLYDIAN — Major with ♭7 (rock/blues sound).
- LYDIAN — Major with #4 (bright, dreamy sound).
VOICE LEAD
To use: Press F2 → Joystick UP → Navigate to VOICE LEAD → Joystick UP toggles ON/OFF.
Voice leading mode. When ON, HiChord automatically selects inversions to minimize melodic motion between chord changes. The system intelligently chooses root position, 1st inversion, or 2nd inversion for each chord to create smooth voice leading.
JOYSTICK
To use: Press F2 → Joystick UP → Navigate to JOYSTICK → Joystick UP toggles between DEFAULT and EXTENDED mode.
Displays current joystick chord modification mode (DEFAULT or EXTENDED).
See Basic Operation section for full chord modification table.
USB_MODE
To use: Press F2 → Joystick UP → Navigate to USB_MODE → Joystick UP toggles between AUDIO and MIDI modes.
USB-C mode selector. Displays current USB configuration:
- AUDIO — USB-C sends audio to computer (class-compliant, no drivers needed).
- MIDI — USB-C sends MIDI note data.
Device will briefly disconnect and reconnect to your computer when switching modes.
Randomize Functions
HiChord includes three randomization features for creative sound design, all triggered via Joystick CLICK:
Random Sound (Waveform Only):
- Press F2 to enter Effects menu.
- Press Joystick CLICK (center press).
- Displays "Random Sound" with dice animation.
- Generates a random waveform from all available sounds (analog, FM, samples, hybrids).
- Keeps all current effects and settings intact.
- Perfect for exploring new timbres.
Random All (Complete Preset):
- Press F1 to enter Settings menu.
- Press Joystick CLICK (center press).
- Displays "Random All" with dice animation.
- Generates completely random preset: waveform, effects, arpeggio pattern, rhythm rate, key, BPM, inversions.
- Great for happy accidents and inspiration.
Random Pattern (Arpeggio/Sequencer Only):
- Press F3 to enter Mode menu.
- Press Joystick CLICK (center press).
- Displays "Random Pattern" with dice animation.
- Generates new random arpeggio pattern AND sequencer pattern.
- Keeps current waveform and effects.
- Automatically sets arpeggio to RANDOM pattern mode.
04 // AUDIO OUTPUT OPTIONS
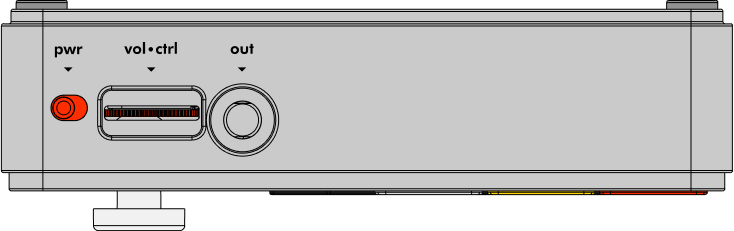
Top Panel: Power button (left), Volume/Control slider (center), Headphone/Line Out jack (right)
HiChord supports multiple audio output methods. You can use any or all of these simultaneously:
Built-in Speaker
Internal mono speaker for portable use. Automatically mutes when headphones are plugged in.
Headphone Jack (3.5mm)
Stereo headphone output. Plugging in headphones automatically disables the internal speaker.
Line Out / Aux Cable
Use the headphone jack to connect to any external speaker, mixer, or audio interface using a standard 3.5mm aux cable. Output level is controlled by the Volume Knob.
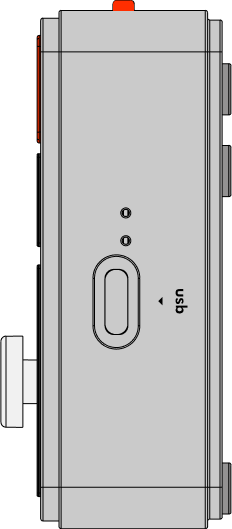
Side Panel: USB-C port for audio, MIDI, and power
USB-C Audio
High-quality digital audio over USB-C (class-compliant, no drivers needed):
- Connect HiChord to your computer via USB-C.
- HiChord appears as an audio interface.
- Record directly into your DAW (Ableton, Logic, etc.).
- Zero-latency digital quality.
- Stereo output.
MIDI Over USB-C
Send MIDI note data to your computer:
- Enable MIDI in F2 menu (navigate to MIDI, press Joystick DOWN).
- Connect to computer via USB-C.
- HiChord sends MIDI notes for all chord buttons and modifications.
- Use with software synths, samplers, or for recording MIDI.
MIDI Technical Specifications
MIDI Channel: Channel 1 (all note and CC messages)
Note Output:
- Velocity: Fixed at 100 (out of 127).
- Note On: MIDI message 0x9.
- Note Off: MIDI message 0x8.
- Tracks up to 12 simultaneous notes.
05 // MODE MENU
HiChord has 14 different playing modes. There are two ways to change modes:
Method 1: Mode Menu (Full Access)
This method gives you access to all modes and allows you to adjust mode-specific settings:
- Press F3 to open Mode menu (base menu shows current mode with animated icon).
- Use Joystick LEFT/RIGHT to cycle through all available modes.
- Display shows mode name with animated preview icon.
- Mode changes take effect immediately as you navigate.
- Press Joystick UP to enter BPM submenu (shows tempo, adjustable with LEFT/RIGHT).
- Press Joystick DOWN to return to Mode menu, then F3 again to exit completely.
The F3 menu structure has been redesigned. Pressing F3 now opens the Mode Selection menu first (showing modes with animated icons), then Joystick UP takes you to the BPM submenu. This two-level design separates mode selection from tempo adjustment. Mode-specific parameters (strum speed, rhythm rates, difficulty) are now adjusted with Joystick DOWN in the base Mode menu, making them more accessible.
Adjusting mode-specific parameters: Once in a mode, you can adjust its settings:
- STRUM: In STRUM mode, press F3 → use DOWN to cycle strum speeds (SLOW/MEDIUM/FAST).
- ARPEGGIO/REPEAT/DRUMLOOP/SEQUENCER: In these modes, press F3 → use DOWN to cycle rhythm rates (1/1, 1/2, 1/4, 1/8, 1/16, 1/16T, 1/32).
- EARTRAINER: In EARTRAINER mode, press F3 → use DOWN to cycle difficulty levels.
All modes accessible via Mode menu: ONESHOT, STRUM, LEAD, DRONE, ARPEGGIO, REPEAT, DRUMMODE, DRUMLOOPMODE, SEQUENCER, CHORDHIRO, EARTRAINER
Method 2: Quick Mode Select (7 Most Common Modes)
Fastest method for the 7 most-used modes:
Hold F3, then press a Chord Button for instant mode switching:
| F3 + BUTTON | MODE |
|---|---|
| 1 | ONESHOT |
| 2 | STRUM |
| 3 | LEAD |
| 4 | DRONE |
| 5 | ARPEGGIO |
| 6 | REPEAT |
| 7 | DRUMMODE |
06 // MODE DESCRIPTIONS
ONESHOT
Function: Standard polyphonic chord triggering with ADSR envelope.
Quick Select: F3 + Chord Button 1
Operation: Hold Chord Button → chord plays → release → envelope releases
STRUM
Function: Guitar strumming simulation.
Quick Select: F3 + Chord Button 2
Operation: Hold Chord Button → notes trigger sequentially with timing delay
Strum Speed: Press F3 to enter Mode menu, then use Joystick UP to cycle through speeds
- SLOW (200ms between notes).
- MEDIUM (80ms).
- FAST (40ms).
LEAD
Function: Monophonic single-note mode for melodies.
Quick Select: F3 + Chord Button 3
Operation: Only plays root note of each Chord Button. New notes cut off previous notes.
Display: Shows note names (C, D, E...) instead of chord names
DRONE
Function: Infinite sustain mode.
Quick Select: F3 + Chord Button 4
Operation: Hold Chord Button → sound continues indefinitely until another chord button is pressed
ARPEGGIO
Function: Automatic arpeggiated patterns, tempo-synced.
Quick Select: F3 + Chord Button 5
Operation: Hold Chord Button → notes play in sequence automatically
Pattern Selection: F1 + Chord Buttons 1-5:
- Chord Button 1: UP (ascending).
- Chord Button 2: DOWN (descending).
- Chord Button 3: UP/DOWN (ascend then descend).
- Chord Button 4: RANDOM.
- Chord Button 5: FINGERPICK.
Chord Mode: F1 + Chord Buttons 6-7 cycles:
- ARP_ONLY — Just arpeggio.
- CHORD+ARP — Sustained chord with arpeggio on top.
- RHYTHM+ARP — Rhythmic chord stabs with arpeggio.
Rhythm Rate: Press F3 to enter Mode menu, then use Joystick UP to cycle through rates (1/1 whole, 1/2 half, 1/4, 1/8, 1/16, 1/16T, 1/32)
REPEAT
Function: Rhythmic gating/stuttering effect.
Quick Select: F3 + Chord Button 6
Operation: Chord repeats at selected rhythm rate (set via F3 + Joystick UP)
Rhythm Rates: 1/1 (whole note), 1/2 (half note), 1/4, 1/8, 1/16, 1/16T (triplet), 1/32 — synced to BPM
DRUMMODE
Function: Manual drum triggering.
Quick Select: F3 + Chord Button 7
Operation: Each Chord Button triggers a different drum sound:
- Chord Button 1: Kick.
- Chord Button 2: Snare.
- Chord Button 3: Hi-hat.
- Chord Button 4: Tom.
- Chord Button 5: Bell/Ride.
- Chord Button 6-7: Additional percussion.
Drum Kits: F2 + Chord Buttons 1-6:
- Chord Button 1: TIGHTKIT (PCM samples, default).
- Chord Button 2: x0x BOX (deep sub bass).
- Chord Button 3: x9x BOX (punchy techno).
- Chord Button 4: LYNN KIT (warm vintage).
- Chord Button 5: KR-78 (lo-fi retro).
- Chord Button 6: TRAP BOX (modern sub).
DRUMLOOPMODE
Function: Pre-programmed drum patterns with variations.
Access: F3 → Joystick UP → LEFT/RIGHT to select DRUMLOOPMODE
Operation:
- Chord Buttons 1-7: Select and toggle patterns (0-6) on/off.
- Hold chord button + Joystick UP/DOWN: Select variation (0-7).
- Joystick LEFT/RIGHT (no button held): Switch drum kits.
7 Patterns:
- Chord Button 1 (Pattern 0): ROCK.
- Chord Button 2 (Pattern 1): DISCO.
- Chord Button 3 (Pattern 2): REGGAE.
- Chord Button 4 (Pattern 3): FUNK.
- Chord Button 5 (Pattern 4): HIP-HOP.
- Chord Button 6 (Pattern 5): ELECTRO.
- Chord Button 7 (Pattern 6): JAZZ.
8 Variations per pattern:
- 0: Original.
- 1: Ghost notes.
- 2: Busier hi-hats.
- 3: Syncopated kicks.
- 4: Fills every 4th bar.
- 5: Half-time.
- 6: Double-time.
- 7: Complex/jazz variation.
AUTODRUM
Function: Rhythm-controlled drum triggering mode (automatically activated from DRUMMODE).
How it works:
- In DRUMMODE, press any Chord Button (1-7) and move the joystick → automatically enters AUTODRUM.
- Release joystick → returns to DRUMMODE.
Rhythm Rate Control (while holding chord button + joystick):
- Joystick UP: 1/4 note.
- Joystick RIGHT: 1/8 note.
- Joystick DOWN: 1/16 note.
- Joystick LEFT: 1/32 note.
- Joystick UP-RIGHT: Swing 8th.
- Joystick DOWN-RIGHT: Swing 16th.
- Joystick DOWN-LEFT: 1/16 triplet.
- Joystick UP-LEFT: Swing 8th.
SEQUENCER
Function: 16-step chord sequencer.
Access: F3 → Joystick UP → LEFT/RIGHT to select SEQUENCER
Recording:
- Enter SEQUENCER mode (in RECORD by default).
- Press Chord Buttons in desired order (up to 16 steps).
- Display shows step count.
Playback:
- Joystick CLICK: Start/stop playback.
- Syncs to BPM and current rhythm rate.
Editing:
- Joystick LEFT/RIGHT: Navigate steps.
- Press Chord Button to change chord at current step.
Sequence Length: F1 + Joystick LEFT/RIGHT (4-16 steps)
CHORDHIRO
Function: Rhythm game for learning chord progressions (Guitar Hero style).
Access: F3 → Joystick UP → LEFT/RIGHT to select CHORDHIRO
Operation:
- Press F2 to select song.
- Joystick UP/DOWN browses songs.
- Click to confirm.
- Press F3 to start countdown.
- Play chords when notes reach hit zone.
Scoring:
- PERFECT (±50ms on EXPERT).
- GREAT.
- OK.
- MISS.
Difficulty Levels:
- EASY: ±200ms timing window.
- MEDIUM: ±150ms.
- HARD: ±100ms.
- EXPERT: ±50ms.
EARTRAINER
Function: Train ear to recognize chords.
Access: F3 → Joystick UP → LEFT/RIGHT to select EARTRAINER
Operation:
- HiChord plays root note, then a chord.
- Press Chord Button (1-7) to guess.
- Immediate feedback (correct/incorrect).
Difficulty: Joystick UP/DOWN changes level:
- BASIC: Simple triads.
- EXTENDED: Includes 7ths, sus, aug, dim.
- PROGRESSION: 2-4 chord progressions.
- PROG+EXTENDED: Complex progressions.
Controls during training:
- F1: Replay root note (hint).
Note: After an incorrect guess, HiChord automatically replays the chord for learning.
07 // LOOPER
Capacity: 2 independent tracks (~20 seconds each)
Getting Started with the Looper
The looper is always available and ready to use. To start recording:
- Press Joystick CLICK to activate the looper → enters WAITING state.
- In WAITING state, optionally adjust bar count (0-8) using Joystick LEFT/RIGHT.
- Press Joystick CLICK again to start recording.
- The looper cycles through states: OFF → WAITING → RECORD → LOOP → OFF.
Mode Compatibility
Looper works in all modes EXCEPT SEQUENCER:
- ONESHOT, STRUM, LEAD, DRONE, ARPEGGIO, REPEAT — Record chords and melodies.
- DRUMMODE, DRUMLOOPMODE, AUTODRUM — Record drum performances.
- CHORDHIRO, EARTRAINER — Record practice sessions.
Note: SEQUENCER mode has built-in recording, so the looper is disabled. However, when you leave SEQUENCER mode while a sequence is playing, it automatically bounces to an available looper track.
Track Selection
Non-drum modes: Joystick LEFT/RIGHT to switch between Track 1 and Track 2
Drum modes: Joystick UP/DOWN to switch between Track 1 and Track 2
Recording Track 1 (First Track)
- Start: Press Joystick CLICK → cycles OFF → WAITING.
- Adjust bars (optional): In WAITING state, Joystick LEFT/RIGHT sets bar count
- 0 = Free mode (no bar limit).
- 1-8 = Fixed bars (recording stops automatically).
- Begin recording: Press Joystick CLICK again
- Free mode: Recording starts immediately.
- Bar mode: Pre-roll metronome counts in 4 beats first.
- Record: Play chords or drums.
- Stop: Press Joystick CLICK (or auto-stops at bar count).
- Playback: Loop plays automatically.
Recording Track 2 (Second Track / Overdubbing)
- Prerequisite: Track 1 must be looping first.
- Switch tracks: Joystick LEFT/RIGHT (or UP/DOWN in drum modes).
- Start: Press Joystick CLICK → cycles OFF → WAITING.
- Begin recording: Press Joystick CLICK again
- Recording syncs automatically to Track 1's loop start.
- Length matches Track 1 (bar count not adjustable).
- Record: Play additional chords or drums.
- Stop/Loop: Press Joystick CLICK to cycle RECORD → LOOP → OFF.
Stopping and Clearing
- Clear a track: Press Joystick CLICK repeatedly until reaching OFF state.
- Clear all: When Track 1 goes OFF, Track 2 is automatically cleared too.
Metronome
Metronome is enabled by default during looper recording.
Provides audible click track during recording (tempo from BPM setting).
Automatic Sequencer Bouncing
Special feature: When you leave SEQUENCER mode while a sequence is playing, HiChord automatically bounces it to the looper!
How it works:
- In SEQUENCER mode, record your chord progression.
- Press Joystick CLICK to start playback.
- While playing, press F3 and switch to another mode (ONESHOT, ARPEGGIO, etc.).
- HiChord automatically captures the full sequence pattern to an available looper track.
- Sequence now plays from the looper, freeing you to play live chords or melodies over it.
Requirements:
- At least one looper track must be empty (OFF state).
- Sequence must be playing when you change modes.
- Bounce captures the entire sequence length.
Automatic Drum Loop Bouncing
Special feature: When you leave DRUMLOOPMODE while a drum loop is playing, HiChord automatically bounces it to the looper!
How it works:
- Start a drum loop in DRUMLOOPMODE (Joystick UP/DOWN and LEFT/RIGHT to select pattern).
- Press F3 to enter Mode menu.
- Switch to any other mode (ONESHOT, STRUM, ARPEGGIO, etc.).
- HiChord automatically captures the full 16-step drum pattern to an available looper track (Track 1 or Track 2).
- Drum loop now plays from the looper, freeing you to play chords over it.
- You can record a second track for overdubbing.
Requirements:
- At least one looper track must be empty (OFF state).
- Drum loop must be playing when you change modes.
- Bounce happens automatically at the loop boundary (step 0).
┌──────────────────────────────┐
│ ◯ C Major                    │
│ ①                            │
│ ONESHOT       Key: C         │
│ ● ○           BPM: 120       │
└──────────────────────────────┘
┌──────────────────────────────┐
│ WAITING                      │
│──────────────────────────────│
│ 4    BARS     <>             │
│                              │
└──────────────────────────────┘
08 // USER PRESETS
Save your own custom sound configurations to 2 user preset slots. These are separate from the built-in hybrid presets (JUNO_POLY, OCEAN_PAD, etc.) and allow you to store your exact settings.
Capacity: 2 user preset slots (P1 and P2)
Saving Preset
- Configure desired sound (waveform, effects, ADSR, etc.).
- Press F2 + F3 simultaneously.
- Display shows Preset menu with P1 and P2 slots.
- Joystick LEFT/RIGHT: Select slot (P1 or P2).
- Joystick UP to save to selected slot.
- Display shows "SAVED PRESET 1" (or 2) confirmation.
Loading Preset
- Press F2 + F3
- Joystick LEFT/RIGHT: Select slot (P1 or P2).
- Joystick DOWN to load selected slot.
- Display shows "LOADED PRESET 1" (or 2) confirmation.
- All settings restored instantly.
What Gets Saved
- Current waveform.
- All effect states (on/off).
- Effect parameters.
- ADSR preset.
- Arpeggio pattern and mode.
- Key shift.
- Glide setting.
- Inversions per chord button.
- Octave shifts per chord button.
- Mode state.
- Custom ADSR times (if set).
- Random waveform configuration (if using RANDOM).
- User samples: Custom samples uploaded via USB are saved to flash memory with your preset.
┌──────────────────────────────┐
│       PRESETS                │
│                              │
│   ┌──────┐   ┌──────┐       │
│   │  P1* │   │  P2  │       │
│   └──────┘   └──────┘       │
│    ▲ SAVE    ▼ LOAD         │
└──────────────────────────────┘
09 // ADVANCED CONTROLS
Custom Envelope Shaping
Attack Time: Hold F1 + turn Volume Knob
- Range: 1-2000ms.
- Only works when no chord is playing.
- Overrides ADSR preset.
- Display shows current attack value.
Release Time: Hold F2 + turn Volume Knob
- Range: 1-5000ms.
- Only works when no chord is playing.
- Overrides ADSR preset.
- Display shows current release value.
Custom Filter Cutoff
Fine Control: Hold F3 + turn Volume Knob
- Range: 20Hz-20kHz (full audio spectrum).
- Precise frequency adjustment.
- Display shows current cutoff frequency.
Battery Status
Hold F1 + F2: Display shows battery voltage and percentage
Factory Reset
Hold F1 + F3: Clear and reset all settings to factory defaults
- Key and octave settings.
- Current waveform/sound selection.
- All effect settings (reverb, delay, filter, etc.).
- BPM and tempo settings.
- Current mode selection.
Note: User presets and looper recordings are NOT affected by factory reset.
Companion App
Connect HiChord to your computer via USB to access the web-based Companion App. This powerful tool allows you to:
- Manage Presets: Save, load, and organize your custom presets.
- Design Sounds: Deep dive into the synthesis engine with visual controls for all 12 oscillators.
- Configure FM/Analog/Sample: Select engines and waveforms for each voice.
- Upload Custom Samples: Transfer your own audio samples to HiChord via USB.
- Update Firmware: Easily flash the latest features to your device.
Access the app at: app.hichord.shop
HiChord Tabs
Learn any song on HiChord with our Song Tab Generator. Enter a song name and get:
- Button Numbers: Which chord buttons (1-7) to press for each chord.
- Joystick Directions: When to modify chords with the joystick.
- Key Setup: What key to set your HiChord to.
- Chord Progressions: Roman numeral analysis and pattern recognition.
- Similar Songs: Discover other songs with the same progression.
Access the app at: tabs.hichord.shop
10 // MUSIC THEORY REFERENCE
This section explains the music theory behind HiChord's chord system. Beginners can skip this and return later!
Understanding the Diatonic Chord System
HiChord uses the Diatonic Chord System (also known as the Nashville Number System), a method of transcribing music by denoting chords according to the scale degree of their root note, rather than by chord name. This system allows musicians to transpose songs instantly to any key.
How It Works
In any major key, there are 7 notes in the scale. Each note becomes the root of a chord, numbered 1 through 7. The system uses Roman numerals to indicate the scale degree and chord quality:
| BUTTON | SCALE DEGREE | CHORD QUALITY | FUNCTION | EXAMPLE IN C MAJOR |
|---|---|---|---|---|
| 1 | I (Tonic) | Major | Home chord, stable, resolves tension | C Major (C-E-G) |
| 2 | ii (Supertonic) | minor | Pre-dominant, leads to V or IV | D minor (D-F-A) |
| 3 | iii (Mediant) | minor | Tonic substitute, adds color | E minor (E-G-B) |
| 4 | IV (Subdominant) | Major | Pre-dominant, creates movement | F Major (F-A-C) |
| 5 | V (Dominant) | Major | Creates tension, wants to resolve to I | G Major (G-B-D) |
| 6 | vi (Submediant) | minor | Tonic substitute, deceptive resolution | A minor (A-C-E) |
| 7 | vii° (Leading Tone) | diminished | Creates strong pull to I, rarely used in pop | B diminished (B-D-F) |
Common Progressions
The Diatonic Chord System makes famous chord progressions easy to recognize and play:
- I-V-vi-IV (Chord Buttons 1-5-6-4): "Axis of Awesome" progression — used in thousands of pop songs.
- I-vi-IV-V (Chord Buttons 1-6-4-5): Classic '50s progression — "Stand By Me", doo-wop ballads.
- ii-V-I (Chord Buttons 2-5-1): Jazz turnaround — fundamental to jazz harmony.
- I-IV-V (Chord Buttons 1-4-5): Blues and rock foundation — 12-bar blues, rock 'n' roll.
- vi-IV-I-V (Chord Buttons 6-4-1-5): Sensitive progression — emotional indie/alternative songs.
Chord Type Reference
HiChord gives you instant access to 16+ chord types via joystick modifications. Here's what each chord type means and how it sounds:
Basic Triads
MAJOR
Formula: Root + Major 3rd + Perfect 5th (Intervals: 4 semitones + 3 semitones)
Character: Bright, happy, stable. The "default" chord sound in Western music.
Example: C Major = C-E-G
Access: Default (no joystick modification)
MINOR
Formula: Root + Minor 3rd + Perfect 5th (Intervals: 3 semitones + 4 semitones)
Character: Dark, sad, emotional. One semitone difference from major changes everything.
Example: C minor = C-Eb-G
Access: Default for Chord Buttons 2, 3, 6 (ii, iii, vi) in major mode
DIMINISHED
Formula: Root + Minor 3rd + Diminished 5th (Intervals: 3 semitones + 3 semitones)
Character: Tense, unstable, dissonant. Creates strong pull to resolve.
Example: C diminished = C-Eb-Gb
Access: Joystick LEFT, or default on Chord Button 7 (vii°)
AUGMENTED
Formula: Root + Major 3rd + Augmented 5th (Intervals: 4 semitones + 4 semitones)
Character: Dreamy, floating, symmetrical. Every note is 4 semitones apart.
Example: C augmented = C-E-G#
Access: Joystick UP+LEFT (DEFAULT mode)
Suspended Chords
SUS4
Formula: Root + Perfect 4th + Perfect 5th (replaces the 3rd with a 4th)
Character: Open, unresolved, neither major nor minor. Creates anticipation.
Example: Csus4 = C-F-G
Access: Joystick DOWN (DEFAULT mode)
Usage: Often resolves to major or minor. Common in rock and folk.
SUS2
Formula: Root + Major 2nd + Perfect 5th (replaces the 3rd with a 2nd)
Character: Airy, modern, ambiguous. More stable than sus4.
Example: Csus2 = C-D-G
Access: Joystick DOWN+LEFT on minor chords (DEFAULT mode)
Usage: Popular in modern pop, ambient, and shoegaze.
Seventh Chords
MAJOR 7
Formula: Major triad + Major 7th (11 semitones from root)
Character: Lush, jazzy, sophisticated. Soft dissonance.
Example: Cmaj7 = C-E-G-B
Access: Joystick RIGHT on major chords (DEFAULT mode)
Usage: Jazz, R&B, neo-soul. The "pretty" 7th chord.
DOMINANT 7
Formula: Major triad + Minor 7th (10 semitones from root)
Character: Bluesy, gritty, creates tension. Wants to resolve.
Example: C7 = C-E-G-Bb
Access: Joystick UP+RIGHT (DEFAULT mode)
Usage: Blues, rock, jazz. The V chord in "V7 → I" resolution.
MINOR 7
Formula: Minor triad + Minor 7th
Character: Smooth, mellow, sophisticated minor. Less sad than plain minor.
Example: Cm7 = C-Eb-G-Bb
Access: Joystick RIGHT on minor chords (DEFAULT mode)
Usage: Jazz, R&B, neo-soul. The ii7 chord in ii-V-I progressions.
HALF-DIMINISHED 7 (m7♭5)
Formula: Diminished triad + Minor 7th
Character: Dark, jazzy, mysterious. Less harsh than fully diminished.
Example: Cm7♭5 = C-Eb-Gb-Bb
Access: Joystick UP+LEFT (EXTENDED mode)
Usage: Jazz, film scores. Common as viiø7 or ii7 in minor keys.
Sixth and Extended Chords
MAJOR 6
Formula: Major triad + Major 6th (9 semitones from root)
Character: Bright, vintage, jazzy. Softer than major 7.
Example: C6 = C-E-G-A
Access: Joystick DOWN+LEFT on major chords (DEFAULT mode)
Usage: Jazz standards, bossa nova, vintage pop.
MAJOR 9
Formula: Major 7 + Major 9th (major 7th + 2nd octave up)
Character: Lush, modern, complex. Very sophisticated sound.
Example: Cmaj9 = C-E-G-B-D
Access: Joystick UP (EXTENDED mode)
Usage: Modern jazz, neo-soul, fusion.
MINOR 9
Formula: Minor 7 + Major 9th
Character: Dark but rich, emotional depth.
Example: Cm9 = C-Eb-G-Bb-D
Access: Joystick DOWN (EXTENDED mode)
Usage: Modern R&B, neo-soul, jazz.
MINOR 11
Formula: Minor 9 + Perfect 11th
Character: Very open, modal, modern. Complex harmony.
Example: Cm11 = C-Eb-G-Bb-D-F
Access: Joystick RIGHT (EXTENDED mode)
Usage: Jazz, ambient, modal music.
11 // SYNTHESIS ENGINE
This section explains HiChord's audio synthesis architecture. Understanding this helps you create custom sounds and understand how presets work.
Voice Architecture: 12-Oscillator System
HiChord uses a 12-oscillator polyphonic architecture organized as 6 stereo pairs:
- Oscillators 0-5: Main voices (one per chord note in 6-note polyphony).
- Oscillators 6-11: Detuned/layered voices (paired with oscillators 0-5 for stereo width).
Example: When you play a 4-note chord, HiChord assigns:
- Oscillators 0, 1, 2, 3 → play the 4 notes.
- Oscillators 6, 7, 8, 9 → play the same 4 notes, but slightly detuned and panned opposite.
- Result: Wide stereo image with rich chorusing effect.
Stereo Panning System
Each oscillator has independent pan control (-1.0 to +1.0):
- Main oscillators (0-5): Typically panned across the stereo field (L to R).
- Layered oscillators (6-11): Panned opposite to their pairs for width.
- Detune: Layered voices are detuned by ±5-15 cents for natural chorusing.
When STEREO effect is OFF, all voices sum to mono center.
Four Synthesis Engines
Each of the 12 oscillators can use any of these synthesis methods:
1. ANALOG SYNTHESIS
Method: Wavetable oscillators with anti-aliased waveforms
Waveforms:
- SINE — Pure fundamental (only 1st harmonic).
- SAW — All harmonics, descending amplitude (bright, aggressive).
- SQUARE — Odd harmonics only (hollow, woody, "8-bit").
- TRIANGLE — Odd harmonics, rapidly descending (soft, mellow).
- POLYBLEP_SAW/SQUARE — Band-limited versions (reduces aliasing at high frequencies).
Use Cases: Classic subtractive synthesis, pads, leads, basses
2. FM SYNTHESIS
Method: Frequency Modulation with 2-operator algorithms
Algorithms:
- SIMPLE — Basic FM (sine → sine).
- EPIANO — Electric piano (Rhodes/Wurlitzer style).
- HX7 — DX7-style digital synthesis (metallic, bell-like).
- BELL — Bell tones with high modulation index.
- ORGAN — Organ algorithm (multiple harmonics).
- BRASS — Brass algorithm (rich overtones).
- WOBBLE — Wobble bass with LFO-modulated FM index.
Parameters:
- modRatio: Modulator frequency ratio (0.5 to 8.0) — determines harmonic content.
- modIndex: Modulation depth (0.0 to 10.0) — controls brightness/complexity.
Use Cases: Electric pianos, bells, metallic sounds, digital textures
3. SAMPLE PLAYBACK
Method: High-quality sample playback with pitch-shifting
Sample Storage: QSPI flash memory (non-volatile)
Available Samples:
- Orchestral: STRINGS, CELLOS, VIOLINS, BRASS.
- Acoustic: ACOUSTIC (guitar), PIANO_UPRIGHT, VIBRAPHONE.
- Keys: WURLI (Wurlitzer electric piano).
- Woodwinds: CLARINET.
- Vocal: VOX_AHH (choir "ahh").
- User: USER_SAMPLE — upload your own via USB!
Pitch-Shifting: Real-time pitch-shifting (-24 to +24 semitones) allows samples to play across full keyboard range
Loop Mode: Sustaining samples loop seamlessly for held chords
Use Cases: Realistic instruments, textural layers, custom sounds via microphone
4. NOISE SYNTHESIS
Method: Filtered noise generation for textural elements
Noise Types:
- WHITE — Full spectrum (equal energy per frequency).
- PINK — Filtered white (equal energy per octave, more natural).
- FILTERED_RESONANT — Noise through resonant bandpass filter.
- METALLIC — Noise with metallic ring modulation.
Parameters:
- filterFreq: Filter cutoff for tonal shaping.
- filterRes: Filter resonance for emphasis at cutoff frequency.
Use Cases: Hi-hats, wind sounds, ambient textures, breath noise in hybrid presets
Voice Architecture
HiChord uses a fixed 6-voice polyphonic architecture where each note in a chord is assigned to a dedicated voice:
- Voice 1: Root note (or first chord note).
- Voice 2: Third (or second chord note).
- Voice 3: Fifth (or third chord note).
- Voice 4: Bass note (root 2 octaves down, or slash chord note).
- Voice 5: Extended chord note (6th/7th when applicable).
- Voice 6: Extended chord note (9th/11th when applicable).
All voices play together simultaneously using the voice pairing system (voices 1-6 are main oscillators, voices 7-12 are detuned/layered pairs). Each voice can use different synthesis engines (analog oscillators, FM synthesis, sample playback, or filtered noise) for rich hybrid textures.
Voice Leading: When VOICE LEAD is enabled, HiChord automatically optimizes chord inversions to minimize voice movement between chord changes, creating smooth progressions.
Example Hybrid Preset — "OCEAN_PAD":
- Oscillators 0-5: ANALOG sine waves (fundamental tone).
- Oscillators 6-11: NOISE (pink, filtered) + FM (low modIndex bell algorithm).
- Result: Warm pad with oceanic texture and subtle digital sparkle.
Signal Flow
Understanding the complete audio signal path:
- INPUT → Press Chord Button + Joystick Modification.
- CHORD LOGIC → Diatonic Chord System calculates actual notes based on key.
- VOICE ALLOCATION → Assigns notes to available oscillators (0-11).
- OSCILLATORS → Each oscillator generates audio using its assigned engine (Analog/FM/Sample/Noise).
- ENVELOPE (ADSR) → Applied to each oscillator (Attack, Decay, Sustain, Release).
- VOICE MIXING → 12 oscillators mixed with pan and amplitude settings.
- BASS OSCILLATOR → Optional sub-bass added (ROOT or SLASH mode).
- FILTER → State-variable lowpass filter (cutoff 20Hz-20kHz).
- MODULATION EFFECTS → Chorus → Flanger.
- TIME EFFECTS → Delay (tempo-synced) → Reverb.
- LOOPER → Optional record/playback (2 tracks, ~20 seconds each).
- OUTPUT → Stereo audio (analog out + USB audio) + MIDI out (optional).
Technical Specifications
| PARAMETER | VALUE |
|---|---|
| Sample Rate | 48 kHz (48,000 samples per second) |
| Bit Depth | 16-bit output, 32-bit float internal processing |
| Polyphony | 6 notes (12 oscillators as 6 stereo pairs) |
| Latency | <3ms (hardware + audio processing) |
| Processor | STM32H750 @ 400 MHz (ARM Cortex-M7 with FPU) |
| RAM | SDRAM for looper buffers (~2.5 MB audio buffer) |
| Storage | QSPI Flash (samples, presets, user recordings) |
| Dynamic Range | ~90 dB (limited by hardware DAC) |
12 // COMPLETE BUTTON REFERENCE
F1 (FUNCTION 1) — MENU & SETTINGS
| ACTION | RESULT |
|---|---|
| F1 (single press) | Enter F1 menu (Key, Octave) |
| In F1 Menu: Joystick UP/DOWN | Change global octave shift |
| In F1 Menu: Joystick LEFT/RIGHT | Change key / transpose |
| Joystick Click (in F1 menu) | Generate random all (waveform, effects, arpeggio) |
| F1 + Chord Buttons 1-5 (ARPEGGIO mode) | Select arpeggio pattern |
| F1 + Chord (chord held first) | Octave DOWN per chord button |
| F1 + Chord (F1 first) | ARPEGGIO: select pattern/mode |
| F1 + Volume Knob | Adjust attack time (custom envelope) |
| F1 + F2 (hold both) | Display battery status |
| F1 + F3 (hold both) | Clear/reset all settings to factory defaults |
| F1 + F2 + F3 (all together) | Enter Firmware Update Mode (DFU) |
F2 (FUNCTION 2) — EFFECTS & SOUNDS
| ACTION | RESULT |
|---|---|
| F2 (single press) | Enter Sounds menu |
| In F2 Sounds Menu: Joystick LEFT/RIGHT | Browse waveforms |
| In F2 Sounds Menu: Joystick UP | Enter Effects submenu |
| In F2 Effects Submenu: Joystick LEFT/RIGHT | Browse effects |
| In F2 Effects Submenu: Joystick UP | Toggle/adjust selected effect |
| In F2 Effects Submenu: Joystick DOWN | Return to Sounds menu |
| In F2 Sounds Menu: Joystick DOWN | Exit menu completely |
| F2 + Chord (F2 held first) | Quick select waveform (1-7 shortcuts) |
| F2 + Chord (chord held first) | Cycle inversions (Root/1st/2nd) |
| F2 + Chord + Joystick | Lock/unlock modified chord type |
| F2 + Volume Knob | Adjust release time (custom envelope) |
| F2 + F3 (hold both) | Open Preset menu / Bounce to looper |
F3 (FUNCTION 3) — MODE SELECTION & FILTER
| ACTION | RESULT |
|---|---|
| F3 (single press) | Open Mode menu (LEFT/RIGHT cycles modes, UP enters BPM submenu) |
| F3 × 6 (rapid taps) | Tap tempo - set BPM by tapping rhythm |
| In F3 Mode Menu: Joystick LEFT/RIGHT | Cycle through modes |
| In F3 Mode Menu: Joystick DOWN | Adjust mode-specific parameters (strum speed, rhythm rate, difficulty) |
| In F3 Mode Menu: Joystick UP | Enter BPM submenu |
| In F3 BPM Submenu: Joystick LEFT/RIGHT | Adjust tempo |
| In F3 BPM Submenu: Joystick DOWN | Return to Mode menu |
| Joystick Click (in F3 menu) | Generate random arpeggio pattern |
| F3 + Chord (F3 held first) | Quick mode select (Chord Buttons 1-7) |
| F3 + Chord (chord held first) | Octave UP per chord button |
| F3 + Volume Knob | Engage filter mode, adjust cutoff (20Hz-20kHz) |
LOOPER CONTROLS (NO FUNCTION BUTTONS)
| ACTION | RESULT |
|---|---|
| Joystick Click | Cycle looper states (OFF → WAITING → RECORD → LOOP → OFF) |
| Joystick LEFT/RIGHT (non-drum modes) | Switch between Track 1 and Track 2 |
| Joystick UP/DOWN (drum modes) | Switch between Track 1 and Track 2 |
| Joystick LEFT/RIGHT (WAITING state) | Adjust bar count (0-8 bars) |
13 // TECHNICAL SPECIFICATIONS
| PARAMETER | VALUE |
|---|---|
| Processor | STM32H750, 400MHz ARM Cortex-M7 |
| Sample Rate | 48kHz |
| Bit Depth | 16-bit internal / 32-bit float processing |
| Polyphony | Up to 12 voices (6×2 stereo) |
| Display | 64×32 OLED |
| Storage | QSPI Flash (samples, presets, settings) |
| RAM | SDRAM for looper buffers |
| Looper Capacity | ~20 seconds × 2 tracks |
| MIDI | USB MIDI class compliant |
| Power | USB or battery (rechargeable) |
14 // TROUBLESHOOTING
No Sound
- Check volume knob (turn clockwise).
- Verify battery charge: Hold F1 + F2 to check battery status.
- Ensure not in DRUM mode (press F3 to change modes).
- Check audio output connection.
Buttons Not Responding
- Check battery level: Hold F1 + F2 together to display battery voltage and percentage.
- Ensure no function button is stuck/held.
Looper Issues
- Verify correct track selected (Joystick UP/DOWN).
- Check bar count setting (F1 + Joystick UP/DOWN).
- Clear track if stuck (F3 + LEFT or RIGHT).
Display Frozen
- Check battery level: Hold F1 + F2 to display battery status.
- Power cycle unit.
- Device may be in sleep mode (press any button).
STILL NEED HELP?
If you're experiencing issues not covered in this troubleshooting guide, or if the solutions above don't resolve your problem, our support team is here to help.
Contact Support: support@hichord.shop
15 // UPDATE FIRMWARE
HiChord firmware can be updated via USB-C using our web-based firmware updater. Updates add new features, sounds, and improvements.
Manual Update Mode: If the automatic updater doesn't work, you can manually enter Firmware Update (DFU) mode by holding F1 + F2 + F3 together for 5 seconds while the device is on. The screen will display "Entering DFU Mode".
Click above for step-by-step instructions and the web updater